Farmer John Writes: Imagine That, Part 2
Harvest Week 24, Week 4 of the Extended Season, November 16th – 19th
Thank You
This is the last week of deliveries for 2016. Thank you for being with us this season—another year of vegetable adventures.
Make Sure You Are Supposed to Be Picking Up a Box This Week
If you have a half extended season share, this is an “even” delivery week as it is Week 24. If you have a half extended season share, you can find out if you are on the odd or even delivery schedule by logging in to your membership.
Your Box This Week — Saturday, November 19th
Please note: this summary is written before we pack your box—be aware that some guesswork is involved. At times, a bit of improvisation is required for selecting the contents of your share. As always, be sure to thoroughly wash all of your vegetables.
- Winter Squash (Butternut or Acorn)
- Spinach (in bag)
- Broccoli Side Shoots
- Potatoes
- Bunched Choi
- Kale Tops
- Baby Choi (in bag)
- Ear of Popcorn (see popping instructions below)
- Garlic
- Parsley
Popcorn
Some people pop it on the cob in the microwave, with kids watching through the appliance window. Some shell it by hand and pop it in a frying pan or popcorn popper.
Please Fold Your Boxes Properly and Return Them, Especially if You have been Stockpiling Them
Return your empty, flattened vegetable box(es) to your delivery site. On your last pickup day, we suggest you transfer your box contents to your own container, and leave your CSA box at the site. If you receive home delivery, place your box(es) in the location where your box is delivered. If you receive fruit, re-cycle your fruit box on your own, as the farm does not re-use your fruit boxes.
Welcome to our Friends Who Receive a Box from the Niles Township Food Pantry or from the Northern Illinois Food Bank This Week
We hope you that enjoy your farm fresh, organic box of vegetables from Angelic Organics Community Supported Agriculture Farm, generously donated by several Angelic Organics shareholders and other friends of the farm. We believe you will be familiar with several of the items in your box, but some of the items are less common. We suggest that you sign up for the free Local Thyme recipe service we offer with your box. Local Thyme has storage and handling tips, a vegetable identification guide, and recipes featuring ingredients that are available in your box. Find the instructions for signing up for Local Thyme at www.angelicorganics.com/local-thyme.
Imagine That, Part Two
Farmer John Continues to Ponder a New Post-Harvest Facility (See last week’s Farm News for Imagine That, Part 1).
Disclaimer, Mission
In Farm News, Weeks 23 and 24, my imagination flattens, lifts and encloses our sprawling, breezy rubbly post-harvest area. If we finally launch this project in an earthly manner, I project it will take place in stages over 3 years. We almost inaugurated it this past spring. Fortunately, instead of lunging into action, Primo and I just kept studying it, discussing it, pondering it, going back to it–squinting and wondering and deciding and then re-squinting and re-wondering.
An aspect of the project, like most projects we undertake at the farm, is that we’ll do most of it in-house, not because it’s cheaper or faster (though expense and speed are considerations), but because everything we want to achieve with infrastructure we feel should spring from our own ideas and our own hands. The reason for this is that the process of creating space informs the process; the construction process always involves a layering, an unfolding relationship to the process itself. We undertake building projects in a somewhat amorphous way, so that they can proceed with a fluidity, informing us with images and inspirations, while we inform the project with our deeds. This might sound abstract, or vague, but it is very real for Primo and me, as we endeavor to optimize and beautify our work. We strive for each building to be a gift in efficiency and order for the farm, and a gift in beauty and harmony for our friends, shareholders, and fellow workers.
This project should be done in the winter, when more time is available to our construction trio–Primo, Victor and Pollo–but it cannot be done in the winter, due to the inclement weather. So it has to done during our growing season, when we are busiest. That creates a puzzle (like most of the rest of farming).
In light of these considerations, we would love to start the first phase of the project in 2017, but I’m not completely confident that we will. I do know that this winter will be dedicated to tying up many loose ends on construction projects throughout the farm, paving the way for a large focused undertaking later.
Onward.
Imagine a Cube
There’s a Steiner exercise where you imagine a cube, and then you rotate the cube in various directions in your imagination. Just so you know, I cannot rotate the cube in my imagination. This is what it has been like to observe our current mishmash of post harvest area surface grades and to imagine a solution. A steep slope of concrete intersects a flat plane intersects a gradual slope. For the cube exercise, I can start to rotate the cube, and then the cube quickly falls apart, sort of like how our concrete has turned to rubble over the years.
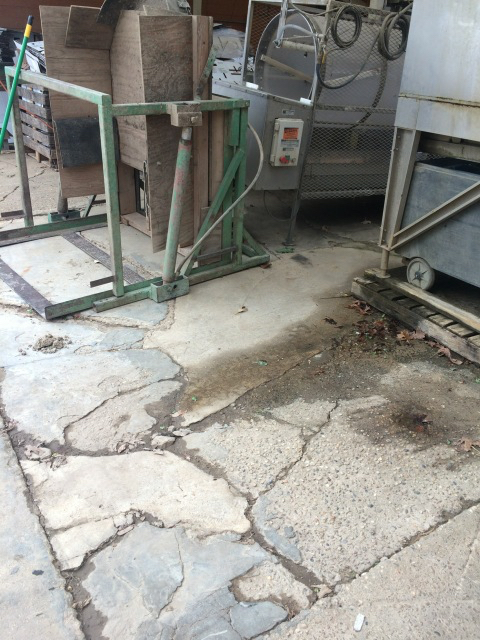
This rubble is not in my imagination
I can sidestep the process of imagining our patchwork of concrete metamorphosing into a smooth floor, simply by foregoing the current condition of our concrete and imagining a large expanse of flat, smooth concrete. However, fashioning that post harvest dreamscape into reality is a process that must transcend the imagination.
Sleep
This sort of undertaking thoroughly infiltrates my sleep. I toss and turn, fantasizing a sprawling compound of post harvest bliss, concrete planes floating about, pallet jacks whizzing over glistening cement…

Darleney the Doughnut Elder Guards Farmer John as he Dreams of Flat Concrete
Raise the Barn
The floors of the two barns need to be on the same plane. This is not currently the case, so the floor of the smaller barn, the pack barn, needs to be raised 8 inches in order to match the floor of the big barn. In order to raise the floor of the packing barn, we need to raise the whole barn, or the ceiling of the barn will be too low. If we are going to raise the barn to accommodate the higher floor, we need to raise it even higher, because it needs to accommodate overhead doors, because the federal regulations barreling their way towards vegetable farms require that post harvest areas be enclosed.
Perhaps, by now, you are thinking it’s best to just keep patching the rubble. Perhaps just considering the need to raise the packing barn two feet towards the key, you are thinking it’s best to just keep patching the rubble. Raising a barn—really? Hey, it’s not that difficult.
From Week 16 Farm News, 1994
That barn, by the way… my parents moved it here after they bought it from our neighbor, Fred Samp. A moving company did it–jacked it up, put it on some big dollies, and towed it across the field. Our milkman–this was back when we were dairying–came to pick up milk late in the morning. The trucks that were towing the barn were hidden behind some trees. All the milkman could see was that big barn moving across the field. [He later told my dad that he thought he had gotten into an accident and died when he saw that barn floating across the field.] He stopped drinking for six months.
You might counter, “but that was a moving company that raised your barn and moved it. It’s their specialty. It’s not your specialty.”
From Week 13 Farm News, 2004
Primo and I have been discussing how to revamp our packing barn. It got a new roof in the last year, and soon it will be getting a new loft floor. We might eventually install coolers inside the barn, and that caused us to evaluate its current height, and to consider raising the whole 27 x 56 ft barn a foot and a half. (We both liked this idea a lot, and it wasn’t long before I was wondering how many other buildings on the farm we should raise. But I shall practice my characteristic restraint and just concentrate on this project for now.)
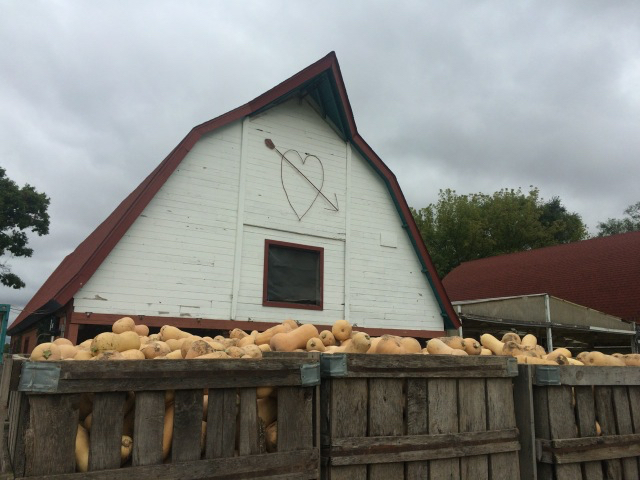
Packing Barn
We ended up raising the barn just enough to install new wooden plates between the foundation and the barn itself. The former plates had rotted out, due to the roof that had been leaking for years. (Do you wonder why the countryside is graced with fewer and fewer barns today, and why most of the remaining ones are in their final throes of decay?)
Back to Today
We like projects such as raising a barn two feet higher. Problem is, they are projects, and it’s hard to know what to prioritize when there are many projects that need to be done on our farm.
In Time
I have broken down this ambitious project of revamping our post harvest area into ambitious sequences.
Step 1
Raise the packing barn 2 feet. The packing barn needs to be raised as an initial project in this series of events, because, besides that we need to raise the floor in the packing barn, we need to put a roof over the whole wash area. This new roof cannot connect to the packing barn roof at its current height, since the packing barn has to be raised at some point to accommodate overhead doors and a higher floor, and once it is at its future optimal height, it has to connect properly to the new roof.
Install new roof over the whole wash area between the two barns, which is about 50 ft by 56 ft. It needs to be a roof that does not require internal support, because we cannot have posts getting in the way of how we need to move the vegetables. The roof will connect the two barns.
Connect the new roof to the existing barn roofs in a way that drains the water away from the roofs. (This is a vulnerability of the project, since water doesn’t always go where one is trying to guide it; it usually will at first, and then the process of decay diligently begins. We’ll do our utmost to fend off this decay in our design of how the roofs meet.)
Step 2
Relocate the two coolers that are now in the washing area. Their walls have rusted beyond repair, so they need to be re-built anyway. I’m not sure yet to where they will be re-located.
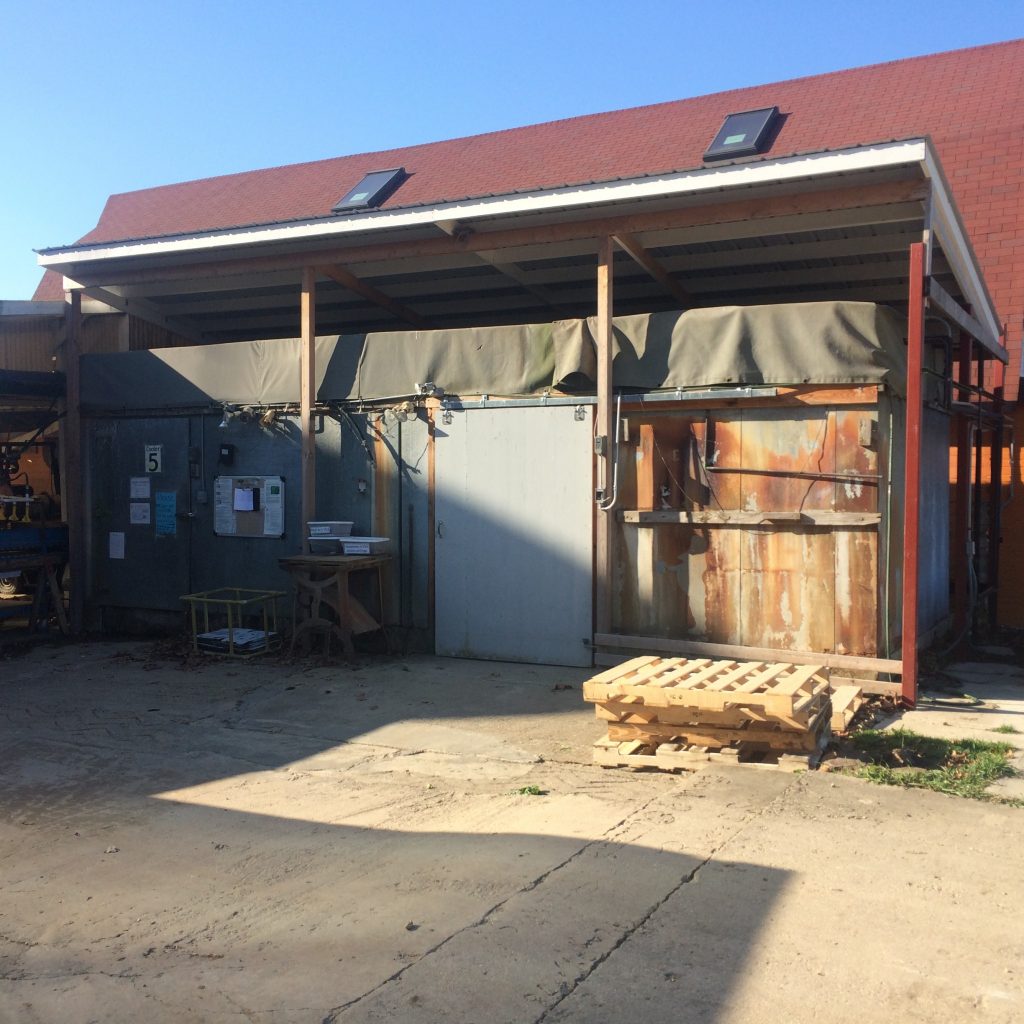
These two scruffy coolers need to be re-located and replaced
Remove all the old concrete that is currently too high for creating the correct level for a newly poured floor. Remove all broken and excessively cracked concrete.
Build up the floor as needed with crushed rock so that the rock is 4 1/2 inches under where the top of the concrete will be. In order to achieve a flat grade, the lower part of the post harvest area needs to end up 20 inches higher than where it currently lies.
Pour concrete. Pour more concrete. Then pour some more concrete. The project will require over 100 yards of concrete. The new concrete will not only cover the current wash area, but it will need to extend considerably beyond this area, to enable smooth access from outside of the area. Make sure that the concrete floor slopes slightly towards a covered gutter, which will slope towards our culvert that drains into a waterway. We use a lot of water washing vegetables and it needs a place to go.
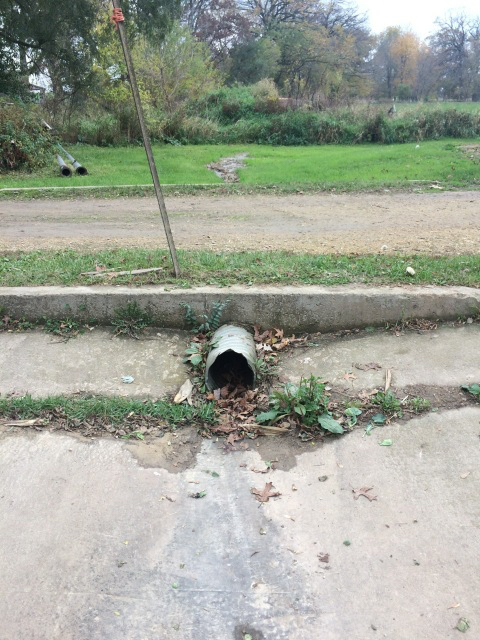
Wash water drains through this culvert to a waterway to the Kinnickinnick Creek to the Rock River to the Mississippi
Install doorways into the sides of the barns, to enable easy indoor passage throughout the post harvest handling area. This will be useful for inclement weather and essential for upcoming federal regulations.
Raise (and probably re-locate) the 3 Sea Castle 44 ft container coolers, since they are now sitting many inches lower than where they will need to sit when they are integrated with the new floor.
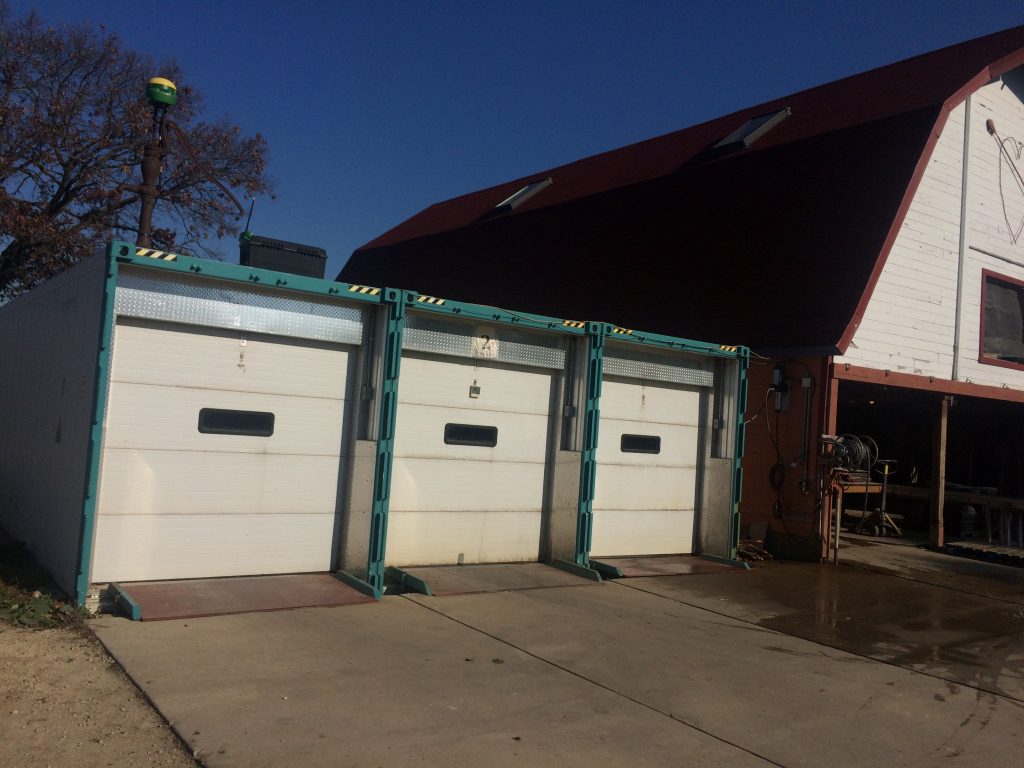
Sea Castle Coolers need to be elevated 1ft and swiveled 90 degrees, for direct access to packing barn
Step 3 — Install End Walls and Overhead Doors
You might think the end walls and doors would be installed in Step One, but Step One only provides the roof from which the end walls and doors will be installed—not the floor which they will reach. The floor of 100 cubic yards of gleaming concrete comes in Step 2. Step One simply provides a rain-proof, shaded wind tunnel.
If
If this all gets done eventually, we’ll have seriously upgraded an important yet rather small part of our whole operation. We don’t just wash, pack, grade, and move vegetables. We also start them in the greenhouse, grow and tend them in the fields, manage soil fertility, upgrade and maintain machinery, keep our grounds orderly, market, keep records, handle requests from our shareholders, maintain our buildings, manage distribution–this is an abbreviated list of what we do on the farm.
Step 4—the Hardest of All
If we get our slick, level, smooth, enclosed post-harvest area completed, you might think it will be smooth sailing from there, but really, that’s when the truly endless work begins, because the government will soon request that every single aspect of vegetable handling is recorded. Who washed it? What were these people wearing? What was the water temperature? Was the water sanitized? How? Was the sanitation level of the water continually monitored? We’d like to examine that sanitation record. I will probably install cameras throughout the whole post harvest area to have a running log of crew activities. However, there are things that cameras cannot capture, such as sanitation levels of the water. I suppose that, with current technology, most of the needed records could be automatically logged, but then, someone has to interact with the ongoing processes to make sure they are being managed to government standards.
Overall
The first three steps of the project are engaging and inspiring. For step 4, having someone in the flat, enclosed post harvest area strut around in a lab coat all day long entering data into an I-Pad that wasn’t captured by cameras or other monitors is not as uplifting as steps 1, 2, and 3. But, as they say in farming, if it’s got to be done, it’s got to be done.
Let us Know
Let Shelly know anything you’d like to share about this week’s box at email hidden; JavaScript is required. Please note the week and day of delivery, your site, when you picked up your box, and any comments about your box.
We hope to see you next year,
Farmer John
